Play / record
[Play / record] tab
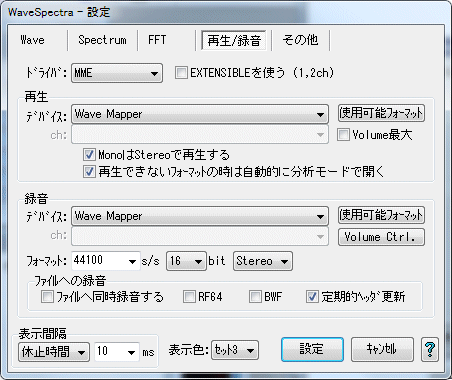
Perform various settings when using a sound device for playback / recording.
|
* If you click the position of a button, a combo box, etc. in the figure below, it jumps to the explanation of that part. |
|
|
|
ASIO time
|
|
WASAPI time
|
|
- MME (Multimedia Extensions [standard WaveIn, WaveOut API])
DirectSound
ASIO (Steinberg Audio Stream I / O)
WASAPI (Windows Audio Session API) exclusive use only
Choose from four.
*WASAPI is supported only on Windows Vista SP1, Windows 7 or later.
Otherwise it will not be displayed in the list.
- It becomes effective in case of MME, DirectSound.
If checked, it is an extended format corresponding to multi-channel multi-bit length Open the device in the WAVE_FORMAT_EXTENSIBLE format.
*If the driver is WDM (Windows Driver Model), if it is compatible 24 bit, 32 bit length will be available.
(However, please note that the driver may be simply converting and not actually supported bit length)
Currently there may be little meaning.
As mentioned in (1, 2 ch), Mono, Stereo It is effective only in case of.
In the case of multi-channel of 3 channels or more, originally WAVE_FORMAT_EXTENSIBLE It is a format.
- It becomes effective in case of WASAPI.
Also in WASAPI exclusive mode event driven mode And a timer drive mode, and
When this check box is checked It operates in event driven mode.
In the event drive mode, buffer read / write is performed by periodic events (interrupts), but in timer mode, timing is measured with a timer.
Event driven may be more accurate, but in principle there will be no data missing if you are working with both.
Normally you should put it in the event drive mode, but depending on the device there are formats that are only valid in the timer mode, so if you can not use the desired format, remove this check Please check with timer mode to see if the format is valid.

- It becomes effective in case of WASAPI.
Set the latency (buffer length) of WASAPI.
It will be delay time for playback / recording, but if it is too short it skips the sound and if it is too long you may get trouble.
Info. Button (described later) allows you to check the settable range and operation mode of latency.
- Select the device to use for playback.
*Wave Mapper when the driver is MME Primary sound driver at DirectSound If you select, the device set in Windows will be used.
- If you check here, you can download 1ch Mono file Play it with 2 ch as Stereo.
If you do not check it will play with 1ch as it is in Mono.
However, even when not checking it seems that when the driver is MME, DirectSound it will always be played in Stereo.
Open automatically in analysis mode when format can not be played
- If this is checked, if it can not be played, such as when there is no supported format or no playback device, it will automatically be followed by an error message to that effect Open in analysis mode (analysis position fine designation mode) .
If you do not like to open it in this mode each time, unchecking here will end with error message only.
Even in that case, while holding down the shift key, play button You can open it in direct analysis mode by pressing.
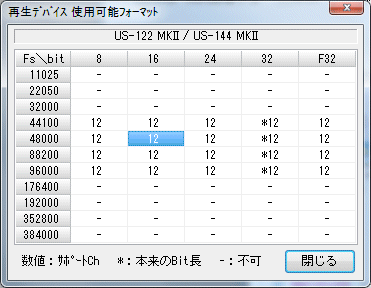
- Pressing this button will display a list of formats (sampling frequency, bit length, number of valid channels) that can be used with the currently selected playback device.
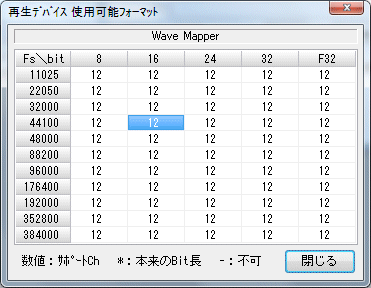
- Number indicates the number of supported channels.
As shown above, "12" indicates that 1ch (Mono), 2ch (Stereo), are supported.
" - " indicates an unusable format. - The part of the format currently set is highlighted.
- F32 of the top bit length represents 32 bit floating point format.
- In order to judge whether it can be used, the device is actually opened once in each format.
Depending on the driver, it may take quite a while.
Although it seems to be able to understand the process of scanning, it takes time, so when you want to stop Please pressstop button.
Note that while holding down the Shift key, By pushing the button, you can change to just the operation by querying with WAVE_FORMAT_QUERY, time will be shortened, but some drivers report lies occasionally, so it is definitely better to actually open. - Depending on the driver, even if it is displayed here as usable, it may not actually operate normally.
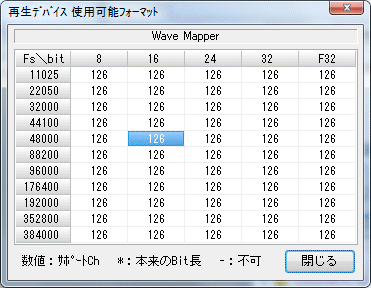
- Normally, checking is limited to 2 channels to save time, but if multichannel data is open, that number of channels will also be checked.
The figure below shows 6 ch (5.1 ch) data open and available format It is when you press the button.
"126" and 6 ch are also checked and you can see that it is valid.
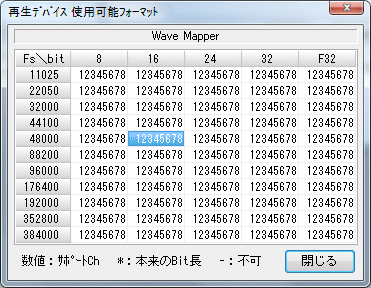
- Hold Ctrl key and use available format If you press the button, you forcefully check all channels.
Even if you are not opening a multi-channel file, all channels are checked, so it is effective when you want to check all the channels.
However, it will take a lot of time.
Currently, the number of channels supported is 8 Until.
- When the driver is ASIO or WASAPI, it becomes a special display.
For ASIO and WASAPI, the operation bit length is fixed, and the application will convert the data accordingly.
The point where it is the original operation bit length is "* 12" It is distinguished with an asterisk (*).
A place without * indicates that data is being converted.
*However, conversion to the direction in which the data length becomes shorter is not performed, so if there is validity, there is no loss of data.
In the figure below, since it is originally processed at 32 bits, we can see that all other bit length data is converted to 32 bits and output.
Here * is one place in 32 bit, but of course it may be attached to more than one place.
- It becomes valid when the driver is MME, DirectSound.
If checked, it will play with full volume.
(Some drivers do not become effective) - Depending on the driver, it is sometimes configured to output at about -6 dB by default, especially with digital output, it can not output with the correct original value.
In that case, if you check here, you may be able to output with the correct value. - In DirectSound, it may not be effective unless you set it on the MME side, so please set it up first in MME. (Play once)
- It becomes valid when the driver is ASIO.
Select the channel to use for playback.
The specified channel will be on the Lch side of the stereo. - When multiple channels are available, normally 0 or 2 (channels are When it starts from 0), even-numbered channels are specified, but there is no distinction in the channel itself, so odd-numbered channels may be specified.
In that case, when considering 2 ch as a normal stereo pair, the original pair of a pair It will be output on the Rch side and on the Lch side of the next pair.
For example, when there are 4 channels in total including AnalogOut 1,AnalogOut2, DigitalOut 1,DigitalOut2 When ch is set to AnalogOut 2, AnalogOut 2 Data of Rch will be output to Lch, DigitalOut1.
Note that in the case of monaural file playback, it is output to only one channel.

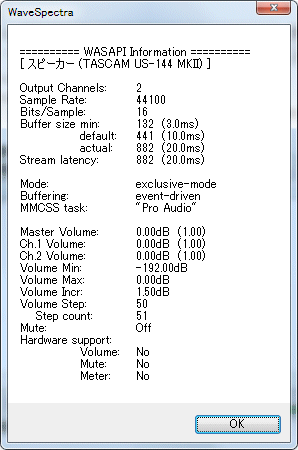
- This button is enabled when the driver is ASIO and WASAPI.
If you push this button normally, the current ASIO WASAPI driver setting information is displayed, you can check the number of channels, sample rate, bit length, latency, etc.
*For WASAPI, pressing this button while holding down the shift key displays more detailed information.
- This button is enabled when the driver is ASIO and WASAPI.
When this button is pushed, in case of ASIO, ASIO Control You can open Panel.
(Nothing happens with unsupported drivers)
In the case of WASAPI, open the sound control panel (playback).
*The above can not be changed during playback operation.
- Select the device to use for input / recording.
*Wave Mapper when the driver is MME Primary sound capture when DirectSound If you select a driver, the device set in Windows will be used.
- Pressing this button will display a list of formats (sampling frequency, bit length, number of valid channels) that can be used with the currently selected recording device.
"12", "-", "etc." Are the same as in the case of playback. - The part of the currently set format is displayed enclosed by a dotted frame.
Make one of the available formats with the mouse By clicking " double click ", you can set the input format just like you set in the next section.
(However, only the sampling frequency and the bit length can be set. Please set Stereo / Mono or multichannel in the next section) - When the driver is ASIO or WASAPI, it becomes a special display as in the case of playback. (See playback section)
Likewise, since the conversion in the direction in which the original number of bits decreases is not supported, it is not recorded with lowering the precision of the data. - When the operation bit length is 32 bits, the data length from the actual ADC (in the future as well?) It is 24 bits so it can be handled as 24 bit data.
(Allow 24-bit and F32 bit file formats)
- It becomes effective when the driver is MME, DirectSound.
Pressing this button opens the volume control on the recording side.
- It becomes valid when the driver is ASIO.
Select the channel to use for recording.
It is the same as for playback.
- This button is enabled when the driver is ASIO and WASAPI.
It is the same as for playback.
- This button is enabled when the driver is ASIO and WASAPI.
When this button is pushed, in case of ASIO, ASIO Control You can open Panel.
(Nothing happens with unsupported drivers)
In the case of WASAPI, open the sound control panel (recording).
- It becomes valid when the driver is ASIO. (Only when recording is stopped)
If checked, turn on the ASIO Direct Monitor function.
(If the driver does not support it, a message will be displayed.) - Even if there is no Direct Monitor function, it seems to be able to check.
(Driver bug?)
Of course nothing happens in this case. - It is set to output all input channels in order from the first output channel.
- Sets the format of sound device input.
* Please set based on the list of available formats on.
* This is exactly the same as setting by double click on the list of available formats on. Both sides are linked.
Note 1:
Please note that not all formats that can be selected are supported by sound devices.
(Sampling frequency conversion may be done by software)
In addition, please write the sampling frequency directly to the combo box, if it is supported in reverse but not in the list.
(Example: 8 ks / s etc.)
*By writing not only the values ??in the list in the combo box but also the direct value arbitrary value.
Note 2:
Next, the input / record button is pressed when changing the format here Please note that it will only take effect when the recording operation is actually done.
Therefore, if you want to confirm the change, please press the input / record button once.
(Each display on the main window also changes at that time.)
- If not checked here, calculate & as direct input from the sound device as data.
If checked, calculate & display while recording to file.
In this case, each time you press the input / record button, you can specify the name of the file to output A dialog box opens.
*Pressing the input / record button while holding down the shift key temporarily starts in the opposite mode to the current setting I can do it.
Normally it is convenient to use the shift key without checking here if you like only input monitor, sometimes recording to file.
- If you do not check this, it will be recorded as an ordinary wave file.
If the maximum Wave file size exceeds 2 GB, the file is automatically split every time it exceeds.
(Although there is also Wave editing software that can handle up to 4GB of 32 bits, it is limited to 2GB so that it has more versatility.This division unit 2GB You can also change it. See here )
For example, when you start recording with the filename ABC.WAV, and when it exceeds 2 GB,
ABC - 01.WAV, ABC - 02.WAV will be made next. Best _99)
If you check here, you can create files of 4 GB or more Record in RF 64 format.
However, since the internal structure of the RF64 file can be handled as an ordinary wave file up to 4 GB, 4 GB Until the truth, it is not in RF 64 format.
(A dummy area called JUNK chunk was created, and when it exceeded 4 GB It will change to a storage location of 64 bit data size)
Note:
If you record in the RF64 format, you can not read with Wave file editing software etc. which can not handle RF64 file.
Please make sure that your software can handle RF64 file.
Also, as a matter of course, the save destination disk must be NTFS.
[Tip]
If you do not check (when dividing by 2 GB), pressing Ctrl + D during recording will force you to split the file at that point.
It is convenient when you want to divide it at breaks of songs.
- If checked here, BWF (Broadcast Wave Format) format.
Even so, BWF's extended information chunk 'bext' Chunks are only added.
Here, the file recording start time, format and recording software name (WaveSpectra) It is recorded.
- If checked here, it will be recorded periodically (Prescribed value 5 seconds), update the file by writing the header information of the file.
Even if you can not finish the recording properly, such as hanging up with some accident, it is a function to save the file up to that point.
If not checked, data of header information such as data size will be written at the end of recording so file size will remain at zero when abnormal termination.
If there is no problem in particular, you can usually keep checking, but if the storage destination disk is an SSD with the initial random write slower, there may be times when the update can not be completed in time and the sound skips Hmm.
In that case please remove the check.
[Technical]
You can change the update interval (5 seconds) as follows.
In the [Conditions] section of WS.INI,
[Conditions]
RecUpdateHeaderPeriod = 10
You can change it by describing it. (In the above example 10 seconds)
*The above can not be changed during recording operation.
When closing the setting dialog box, When you press the [Cancel] button and close it, all settings up to that point will return to the state when the dialog box was opened.
Therefore, you can temporarily make another setting.
All the settings of the main window, including the setting in the setting dialog, It is stored inWS.INI(WS - 2. INIforWaveSpectra: 2for the second) and reproduced at the next start It will be.
Created with the Personal Edition of HelpNDoc: Easy CHM and documentation editor
