How to use
How to use
* In order to make the display screen compact as much as possible, explanatory characters on the screen are omitted as much as possible, so each button and the setting combo box The function will be displayed by stopping the mouse pointer for several seconds on each, so please check in advance.
In the explanation below, we will use the name of the button etc. displayed at that time.
Also, since you are using heavy popup menus with the right mouse button, please check by pressing the right button on the combo box or unit letters etc.
* Most numeric setting combo boxes except the combo box fixed exclusively for selection have direct values other than selecting the value of the previously set list By writing You can enter " any value "
Reading / saving setting parameter file
 Read parameter button
You can read the setting parameter file and recreate all saved parameters.
* By loading INIT.WG which was automatically created at the time of initial startup, you can restore all settings to the initial state.
* You can also open it by dragging and dropping a parameter file (*. WG) from Explorer etc. save parameter button
All current parameters can be saved as setting parameter file.
You can reproduce it at any time by storing the current setting with a name and saving it.
When saving, it is convenient to write a comment for explanation in the edit box under the button.
(Comments and parameters are saved in the file)
Output to sound device
 When you press the output device button to the sound device, Output the parameter signal directly to the sound device.
* The sound will not stop until stop button .
Wave file / output to text file
- Wave file length / sweep length combo box
 and the file length Immediately after setting
  Immediately press the output button to Wave file By doing so, you can create a wave file.
Since a dialog box for specifying the file name opens, specify the file name and create the file.
Hold down the Wave file output button while pressing Shift key to output to a text file (*. WGT) can.
arbitrary value by selecting the preset value in the Wave file length / sweep length combo box or writing the direct value in the file length > .
* Wave File Length / Sweep Length You can also set the number of seconds in the combo box below the decimal point.
For example, when the sampling frequency is 48000 Hz If you want to create a Wave file of only 4096 samples, combo box It is possible to set it to 0.0853333. (4096 / 48000)
* The Wave file length / sweep length combo box is also used to specify the length of the sweep.
* An example of a text file format.
"WaveGene Text Format", 1.00 ← First line title and version
"Sampling Frequency", 48000 ← Sampling frequency
"Bits", 16 ← number of bits
"Channels", 2 ← number of channels
"Samples", 48 ← number of samples
"Max", 32768 ← Maximum value of data
"Data", 96 ← indicates that 96 amplitude data follow
0, 16422, 12539, 16422, 2317, 16422, 30273, 16422, 32767, -16422 ...
↑ Thereafter, 96 pieces of amplitude data (repeated every 10 rows per row)
In the case of Stereo, in order of Lch and Rch
Number of channels, number of samples, maximum value, amplitude data is the same as the text format of the user waveform.
How to use user waveform .
Select playback device
 Pressing the playback device button opens a dialog box and uses it for playback You can select the sound device you want.
For details, please refer to Playback Device Setting Dialog .
End
- Termination, especially because there is no dedicated button, either the upper left system menu button or the upper right Close button
 .
.
Waveform display
You can change the size of the waveform display by dragging the bottom edge of the window.
(Waveform display part can be expanded and contracted only to the lower side, it can not stretch sideways.)
The outputs of the left and right channels are displayed in different colors, respectively.
In multi-channel format, waveforms are displayed 2ch at a time, and can be switched by " display channel " combo box.
![]() Mono / Stereo's time
Mono / Stereo's time
 When it is multichannel
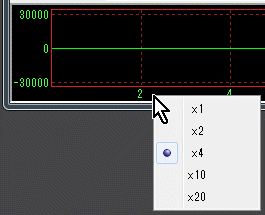
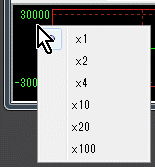
The display magnification of the horizontal axis (time) and the vertical axis (amplitude) can be changed in the popup menu displayed by clicking the right button of the mouse near the numeric display area of each scale.
 Display magnification of horizontal axis
 Display magnification of vertical axis
* The horizontal axis (time) range is the number of samples of the internal calculation buffer (filter length + 1) when the display magnification is x1.
For details, see filter length .
* When the display magnification of the horizontal axis (time) is x2 or more, in order to make the flow of the waveform as much as possible and make it easy to see, the same thing as the trigger action of the oscilloscope is displayed.
(Trigger level: 0 Slope: +, the trigger source is Lch in the case of Stereo, the first channel of the display channel when it is 3 or more)
Also please be aware that it may not always stop depending on the waveform.
* The maximum value of the vertical axis is -127 to 128 when the bit length of the format is 8 bits, otherwise it is -32768 to 32767.
Even if it is 24 bits or more, please note that it will be converted into 16 bit value.
* In addition, the waveform display is only connecting the sample points of the PCM signal with a straight line for the sake of convenience.
Therefore, it is different from the analog waveform actually output from the D / A converter.
For example, in the case of a sine wave with a high frequency, there are few sample points, so it looks like a jaggy waveform, but the analog waveform actually output from the D / A converter is interpolated into a smooth sine wave.
In order to reproduce an actual analog waveform, it suffices to interpolate the waveform between sample points and draw it, but for now it does not support it.
* The output level is displayed in dB for each channel during signal output (including output to file).
At this time, when the output signal overrides the level, its background is displayed as " red ".
(If the value is zero, " ----- " will be displayed)
![]()
Created with the Personal Edition of HelpNDoc: Free Qt Help documentation generator