Measurement mode
Measurement mode
Measurement mode button in the main window ![]() Press to enter the measurement mode.
Press to enter the measurement mode.
An operation button appears at the bottom, the part displaying various measurement results is taken to the left of the Spectrum display window, and the graph display window is slightly reduced to the right.
Note:Spectrum 3D is not displayed in measurement mode. (Similarly, during measurement mode Spectrum 3D display is not possible)
* If you click the position of a button, a combo box, etc. in the figure below, it jumps to the explanation of that part.
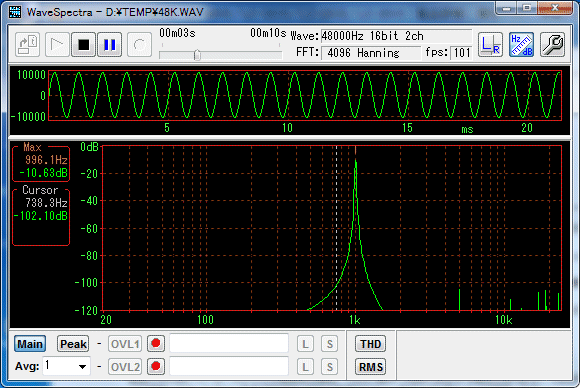
Real-time maximum value display function
- At the top of the measured value display area on the left, the maximum of the measurement Spectrum Frequency and amplitude are always displayed.
*At this time, a short marker indicating the frequency position is displayed below the upper horizontal axis of the graph display window.
*You can improve the accuracy of the numerical values ??here.
Setting dialog Spectrum tab - numerical display (Max, lead out) - interpolate to improve accuracy .
- In the measurement mode, always clicking the mouse cursor at an arbitrary place in the Spectrum display window always displays the lead-out cursor (vertical dotted line) and can read the value of the waveform at that part.
The value is displayed below the maximum value of the measured value display area on the left.
*You can improve the accuracy of the numerical values ??here.
Setting dialog Spectrum tab - numerical display (Max, lead out) - interpolate to improve accuracy .
*You can erase the lead-out cursor by clicking the mouse again at the same position as currently displayed.
*The lead-out cursor searches for the peak value of the nearest neighbor in the high display density portion of the graph " Retracted "
Note 1:
Therefore, even if you click the mouse at the same position while trying to erase the lead-out cursor during the measurement, the same position may not be specified due to the change in the uneven state of the graph.
In such a case, once you move the cursor to another position (such as a fixed peak, a low frequency part of Log display with a low graph display density, etc.), you can erase it by clicking again there.
Note 2:
Only during pause, as with normal mode, it leads out with a small display window.
At this time, not only the above peak detection but also automatic dip detection function works in the same way.
various buttons at the bottom
 button
You can display or erase the main spectrum (normal real-time measurement waveform).
*Hereinafter, when simply referring to the measured waveform, this main spectrum will be indicated. button
As long as this button is pressed, the waveform that holds only the peak of the measured waveform is always loaded into the buffer of overlay 1 (see below).
At this time, the display of the overlay 1 (OVL 1 button) is simultaneously performed As it is turned on, the measured waveform and the peak-held waveform will be displayed at the same time unless intentionally turned off.
* While thebutton is not pressed, the peak is not updated.
*Peak reset is possible by pressing this button again.
(Each time the button is pressed down, the buffer is reset and peak hold operation is started.)
*ON / OFF of display of peak-held waveform only To do this, please use the OVL 1 button. (Average)
If this combo box is set to a number other than " 1 ", the average waveform of the measurement waveform for that number is loaded into the buffer of overlay 2 (see below).
At this time, the display of the overlay 2 (OVL 2 button) is simultaneously performed As it is turned on, the measured waveform and the average waveform will be displayed simultaneously unless intentionally turned off.
*By writing not only the values ??in the list in the combo box but also the direct value arbitrary value.
*The average waveform is a simple average of the specified number of times for each point.
*In order to stop the average operation, "" 0 " Please also set).
*To turn ON / OFF only for the average waveform display, set OVL 2 Please use the button.
Overlay
For storing and superimposing measurement results of spectrum, 1 There are two of two.
 and
and  button
On / Off display of overlay 1 or 2 Specify.
* Whileis being displayed, the readout cursor can be used to read the value in the same way as the measured waveform.
* Spectrum display type in the setting dialog< Settings are also valid for overlays. (Capture button)
Measurement waveform data at the moment when this button is pressed is overlaid 1 Or you can import it into the buffer of 2.
At this time, the display of the corresponding overlay (OVL 1 Or OVL 2 button) will also be turned on at the same time, so explicitly Unless it is set to Off, the measured waveform and the captured waveform will be displayed at the same time.
*In capture, generally peak hold, or The average operation must be stopped.
However, intentionally capturing itself during each operation is not particularly disadvantageous. (for comment edit boxes OVL1, OVL2)
Here you can write a brief description of the overlay data.
This comment is also saved when saving the overlay data described later, and it will be displayed again on later reading. (Load) button
Read the saved overlay data file.
*The currently set FFT data length, sampling frequency It can not be read unless it is an overlay data file saved with the same settings as the above. (Save) button
Save the data in the buffer of the overlay to a file.
*Overlay data is saved with *. WSO extension, but the actual content is in text format, It is in CSV format.
Therefore, it can also be loaded into other applications such as Excel.
[Detailed format of overlay data (example)]
" WaveSpectra Overlay ", 1.10 First line Title and version
" Comment ", " Overlay Test 1 "Line 2 comment
" Sampling Frequency ", 44100 sampling frequency & lt; BR & " FFT Samples ", 4096 & lt; Number of FFT samples & lt; BR & " Amplitude ", 2049 & lt; Below amplitude data, 2049 continuation
1.0397973969882, 0.99449218972777, 0.858296426766904, ......
Thereafter, 2049 pieces of amplitude data (in order from direct current component to one row Repeat with 8 pieces each)
*The number of data is (FFT Samples) / 2 + 1
*The frequency interval is (Sampling Frequency) / (FFT Samples)
*The data is the absolute value of the FFT result itself. (Max. 32768)
DB processing etc. are not done.
In other words, it is irrelevant to the screen display setting etc. at the time of output.
Note 1:
Note that the results of Peak (peak hold) and Avg (average) are also stored in this overlay buffer.
That is, as with each of the other overlay data, each result also includes Load / Save Etc. are possible.
Note 2:
Supplement for lead-out, pause, automatic peak / dip detection function.
When the waveform display is overlay only (main waveform is Off), the target of the automatic peak detection function of the lead-out cursor changes to an overlay.
At this time, overlay 1 takes precedence over 2.
That is, if both overlays 1 and 2 are displayed, the peak detection is overlay 1 I work on.
Other measurement functions
 button
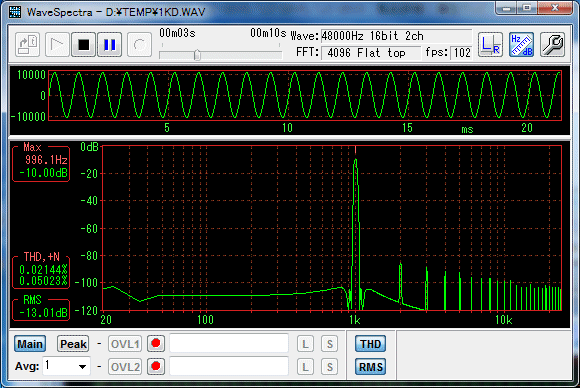
Total Harmonic Distortion, and THD + N (Noise) or S / N (Signal to Noise Ratio) is measured and displayed.
*Since THD + N and S / N are only the difference in display (dB in reciprocal), THD Every time you press the button, the combination with THD is switched.
*If the lead-out cursor is being displayed, the frequency of the position indicated by it, the lead-out cursor is erased In case, it will be the frequency of the automatically detected maximum value.
(Therefore, it is usually more convenient to delete the lead-out cursor)
*Distortion measurements vary considerably depending on the window function used, etc. (I get an error)
Since we summarized notes on distortion measurement etc., please refer to About distortion measurement .
Note:About the measurement target
When the waveform display is overlay only (main waveform is Off), the target of measurement changes to an overlay.
At this time, overlay 1 takes precedence over 2.
That is, if both overlays 1 and 2 are displayed, the measurement is overlay 1 I work on. button
The effective value (Root Mean Square value) of the Wave waveform is converted into a square wave with the maximum amplitude It displays in dB as a ratio to that of Sin wave.
You can set which to do with Settings dialog Wave tab RMS value .
*Only this, the measurement target directly uses the original Wave data that was cut out.
Therefore, it is not affected by the kind of window function etc.
Note:
Both THD and RMS are displayed at about 1 second intervals during operation.
Created with the Personal Edition of HelpNDoc: Full-featured Documentation generator